Part 1: Laying the Groundwork for Milk Training from Day One
Training a heifer to be milked, often referred to as milk training, can be challenging, but it is generally worth the effort. If you’ve ever milked a poorly trained cow, you understand why training is crucial. Nobody wants to milk a jumpy cow that spills your pail, creates a mess in the stand, and won’t let you touch her quarters to clean them.
Human Touch
Begin your journey with your future milk cow by getting her accustomed to human touch. This process begins the moment she sets hoof on your property, whether she’s a newborn calf or a purchased addition. Initiate this bonding process gradually by gently stroking her back, sides, down to her hooves, and under her belly. This shouldn’t be a rushed process; instead, spend a little time every day. The aim is to make this a calming and routine practice.
Touching Her Udder
Progressively extend your touch to her udder, but remember never to squeeze her teats until she comes into milk after calving. Cleanliness is crucial to prevent any potential infections. The next step is getting her used to the milking stand. If the only times she’s been in it have been during a vet visit where she is poked and prodded, she won’t have very good associations with being there. So make it a regular thing to bring her in, give her some treats, and take her away again.
Sounds

If you plan on machine milking, turn on the machine a couple of times so she gets used to the noise. If you’re going the hand-milking route, imitate the sound of a stream of milk hitting the bottom of the pail. You can accomplish this with a squirt from a water bottle. In short, make all the sounds you’d hear during milking, so she gets used to them.
This might seem superfluous, but think about the difference. When she’s out in the pasture with her friends, is very different than in the barn. In the barn, she’s alone, and there are all sorts of weird noises. That’s a lot to get used to. Better do it now during your time milk training, rather than after she has calved and has hormones raging through her system.
Freshening
After your heifer calves, chances are she’ll have some edema. Her udder will be sore and swollen, and it will be nothing like what you always imagined. We all imagined milking our family cow, dreaming of frothy lattes and homemade ice cream while she stands there all sweet and calm. Most likely, she’ll be a little upset because, despite all your prep work, it’s not quite the same when it’s the real thing.
Part 2: Keeping You Both Safe for the First Milking Sessions
To make sure the first milking sessions go well, there are several methods you can use to secure your cow and keep her from kicking.
It might seem cruel to tie her, but remember, you’ll need her to stand still for her calf to latch on and nurse and for you to milk her out and give her some relief after calving. The best way to treat edema and avoid mastitis is to keep the milk moving out so bacteria can’t build up.
You’ll need to help her get past that unfamiliar feeling in the first few days so you can milk her out every 12 hours in the coming months. Unfortunately, you need to sit right where she’s going to kick, since cows kick out on the sides in a sweeping motion from front to back. Securing your cow makes it safe for you to sit next to her to milk.
Methods for safely securing a cow while milk-training her:
Rope Around the Hock
Select a soft, thick lead rope that won’t cut into your cow’s leg. Slip the rope through the metal clasp, creating a loop around the hock on the side you’ll be milking on. It’s recommended that someone else hold the rope with some tension to reduce the range of motion for that leg so she can’t reach you. While it’s possible to tie the rope to something sturdy behind her or wrap it behind the stanchion so you can hold it yourself, these little cows are mighty strong. You may hurt yourself trying to hang on while milking. Recruit some help.
Risks: Some cows might panic or lose their balance, and that’s a situation no one wants. To reduce the risk, have someone hold the rope so it can be dropped at a moment’s notice.
Hobbles
Hobbles can be made of all sorts of different materials: Metal, leather, chain, or even simple rope. Generally, hobbles consist of two connected loops that tie around the cow’s hind legs above the hock, securing them to each other so they can’t kick.
Risks: Hobbles can catch a teat and tear it off, especially metal hobbles with a chain.
Kick Bar or Rope
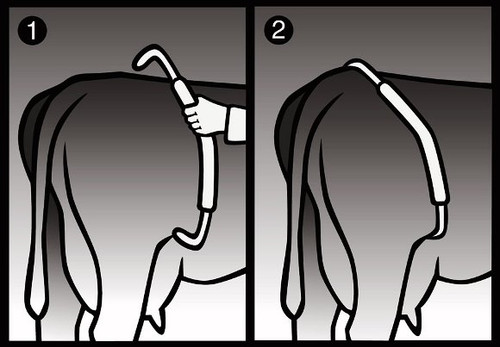
A kick bar is a metal bar that pinches nerves to reduce the cow’s range of motion and prevent her from kicking with full force. One end of the bar sits above the hock and below the hip, and the other end hooks over the back. This position allows the bar to swing freely with the cow’s movement, discouraging kicking but otherwise not restricting movement. When using this for miniature cows, be sure to purchase a kick bar that can be adjusted to accommodate their smaller size.
Similarly, tying a rope tightly all the way around, in front of the udder and both hips, and over the tendons for the legs makes it almost impossible for her to lift her legs to kick. She’s unlikely to fall over and can still walk if she panics, and you need to release her head.
Risks: It can take time for a cow to get accustomed to wearing it, and a flighty cow can lose their balance. Introduce it gently, so they have time to get used to the feeling and won’t be caught off guard. Be prepared to pull it off quickly if needed.
Maybe you won’t need any of these methods for milk training, and your little lady stands like a rock right off the bat. It does happen, but rarely. It will pay off to be prepared and have your equipment and a plan ready, just in case. Before you know it, in a few weeks’ time, you’ll be attuned to each other, and milking will be rewarding in every sense of the word. Those frothy lattes and homemade ice cream won’t be a dream but a reality!
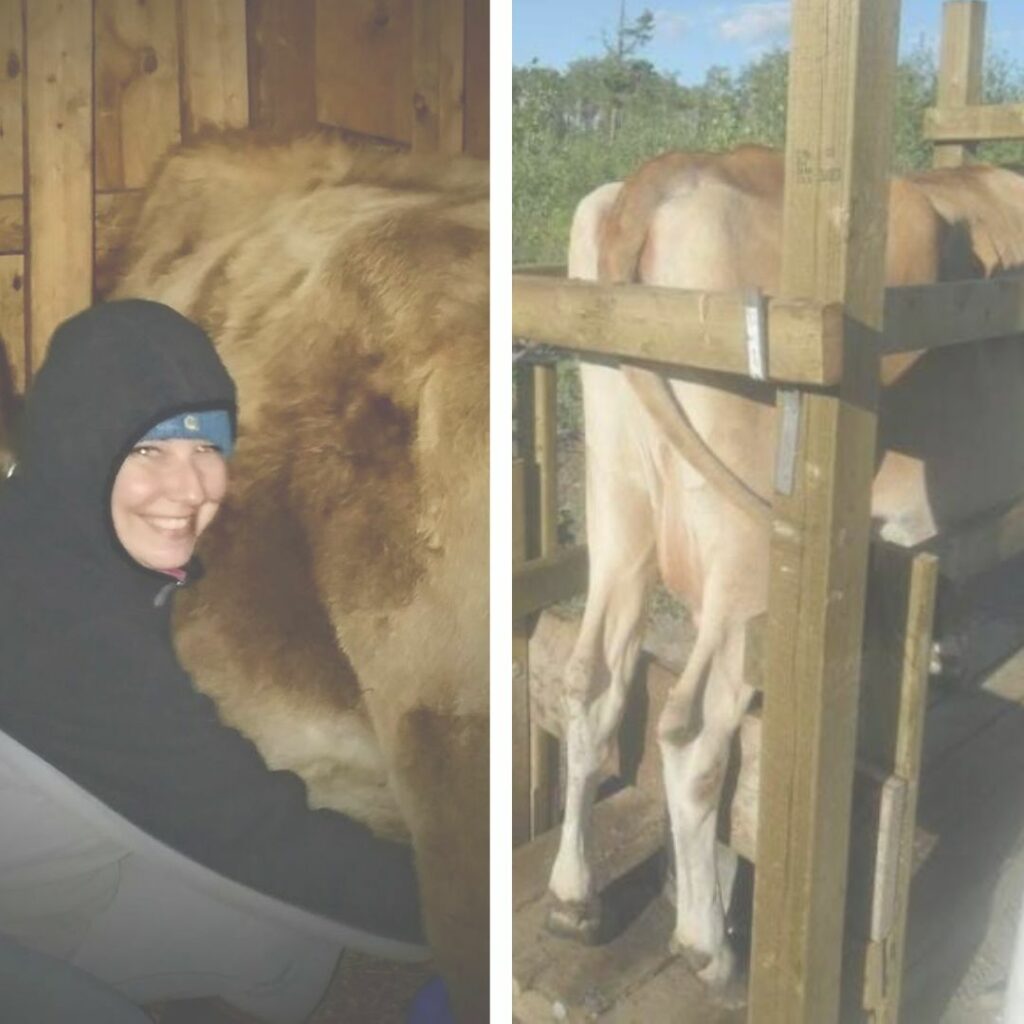
One Cow’s Story
Below is a story of how milk training began with a cow who had not been previously handled.
You might also like these blog posts:
To Start with a Cow or Heifer: Which is Right for You?